Showing posts with label free. Show all posts

Monday, November 11, 2019

SIEMonster V4 - Free | Open Source Security Incident and Event Management (SIEM)

SIEMonster Security Information and Event Management (SIEM):

                                                                                              built on customizable, components. Included is UEBA, Bro, Suricata, The Hive, Cortex, Apache Ni-Fi, Kafka, MISP and Wazuh.


SIEMonster provides Community Edition is a single appliance or Virtual machine, for companies from 1-100 endpoints. It is completely free to use.


 SIEMonster is a collection of the best open source security tools and our own development as professional hackers to provide a SIEM for everyone. We showcase the latest and greatest tools for security professionals and our Community Edition v.4 Fully Loaded has it all. Designed for smaller organizations, charities, classrooms or even those who just want to check out our Fully Loaded SIEM. This edition is completely free, for the community and to be supported by the community.


Community Edition gives you the ability to monitor all network assets in an affordable scalable solution. This single server solution makes it easier for organizations who only have 1-100 endpoints. To access the Community Edition you will need to sign up to the Community Portal, which is available via the download button on our website. There you will also find all the resources you will need to help install and learn about SIEMonster. We have created an admin guide and videos for you. You are also encouraged to interact with other Community Edition users for support or just share how you are using the SIEM and even help out another user, after all that’s what Community is all about.

SIEMonster’s slogan is SIEM for everyone and this is why our prices are so affordable. Whether you are a small, medium or large enterprise we have the right product and licensing for you.

Pre Requisites :

You will need a minimum of 32GB RAM and 8 VCPU’s of power.

Note: Community edition will monitor up to 100 endpoints at 5,000 EPS as it’s designed to give you a taste and allow you to play with the product for as long as you like.

When you’re ready to get serious, let us know, and we’ll help you with our other editions.

Reference : Docs | Videos

https://siemonster.knowledgeowl.com/help

Download Link:

https://go.siemonster.com/Community-Edition

Thursday, September 26, 2019

DocBleach - Content Disarm and Reconstruction(CDR) - Open Source tool

DocBleach:

              is an advanced Content Disarm and Reconstruction open source software. Its objective is to remove misbehaving dynamic content from your Office files, or everything that could be a threat to the safety of your computer.


                                    DocBleach allows you to sanitize your Word, Excel, PowerPoint, PDF, ... documents. This repository contains the DocBleach Web API, packaged as a docker service. Two clicks and you'll feel safer.


Let's assume your job involves working with files from external sources, for instance reading resumes from unknown applicants. You receive for example a .doc file, your anti-virus doesn't detect it as harmful, and you decide to open it anyway. You get infected. You can use DocBleach to sanitize this document: chances are you don't get infected, because the dynamic content isn't run.

Howto's

To build DocBleach, use Maven:
$ mvn clean package
...
[INFO] ------------------------------------------------------------------------
[INFO] BUILD SUCCESS
[INFO] ------------------------------------------------------------------------
[INFO] Total time: 10.696 s
[INFO] Finished at: 2016-12-19T17:36:10+01:00
[INFO] Final Memory: 29M/234M
[INFO] ------------------------------------------------------------------------


The final jar is stored in cli/target/docbleach.jar.
To use DocBleach, you may either use the Web Interface or run it in CLI:
java -jar docbleach.jar -in unsafe_document.doc -out safe_doc.doc
The input file may be a relative/absolute path, an URI (think: http:// link), or a dash (-).
The output file may be a relative/absolute path, or a dash (-).
If a dash is given, the input will be taken from stdin, and the output will be sent to stdout.
DocBleach's information (removed threats, errors, ...) are sent to stderr.

Download Link :

https://github.com/docbleach/DocBleach.git
https://github.com/docbleach/DocBleach-Web
 

DocBleach - Online ( Hosted in OVH )

Sanitizes a potentially dangerous file (Office Document, PDF), by removing macros and other active contents.

Friendly reminder: do NOT post sensitive documents here, unless you trust this page owner.


Online Link : https://www.docbleach.ovh/
 

Sunday, September 15, 2019

Threat Hunting Tool - Bro (Zeek) Network Security Monitor

Bro (Zeek) - Threat Hunting Tool:

A powerful framework for network traffic analysis and security monitoring.Bro is a passive, open-source network traffic analyzer. It is primarily a security monitor that inspects all traffic on a link in depth for signs of suspicious activity. More generally, however, Bro supports a wide range of traffic analysis tasks even outside of the security domain, including performance measurements and helping with trouble-shooting.


Note that "Zeek" is the new name of what used to be known as the "Bro" network security monitoring system.


Key Features

  • In-depth Analysis Zeek ships with analyzers for many protocols, enabling high-level semantic analysis at the application layer.
  • Adaptable and Flexible Zeek's domain-specific scripting language enables site-specific monitoring policies and means that it is not restricted to any particular detection approach.
  • Efficient Zeek targets high-performance networks and is used operationally at a variety of large sites.
  • Highly Stateful Zeek keeps extensive application-layer state about the network it monitors and provides a high-level archive of a network's activity.
 Download Link :

https://www.zeek.org/download/index.html

Tuesday, August 20, 2019

Malicious Software Removal Tool / Safety Scanner - Microsoft


Malicious Software Removal Tool (MSRT) :

                                                                 helps keep Windows computers free from prevalent malware. MSRT finds and removes threats and reverses the changes made by these threats. MSRT is generally released monthly as part of Windows Update or as a standalone tool available here for download.


Use this tool:
  • If you have automatic updates for Windows turned off. Windows Update automatically downloads and runs MSRT in the background.
  • If you suspect an infection from prevalent malware families
  • To complement your antimalware product.

MSRT targets prevalent malware families only.

Download Link :

https://www.microsoft.com/en-us/download/details.aspx?id=16

Microsoft Safety Scanner:


is a scan tool designed to find and remove malware from Windows computers. Simply download it and run a scan to find malware and try to reverse changes made by identified threats.


Safety Scanner only scans when manually triggered and is available for use 10 days after being downloaded. We recommend that you always download the latest version of this tool before each scan.

Download 

Monday, February 11, 2019

Gorsair - Docker API Penetration Testing Tool

Gorsair

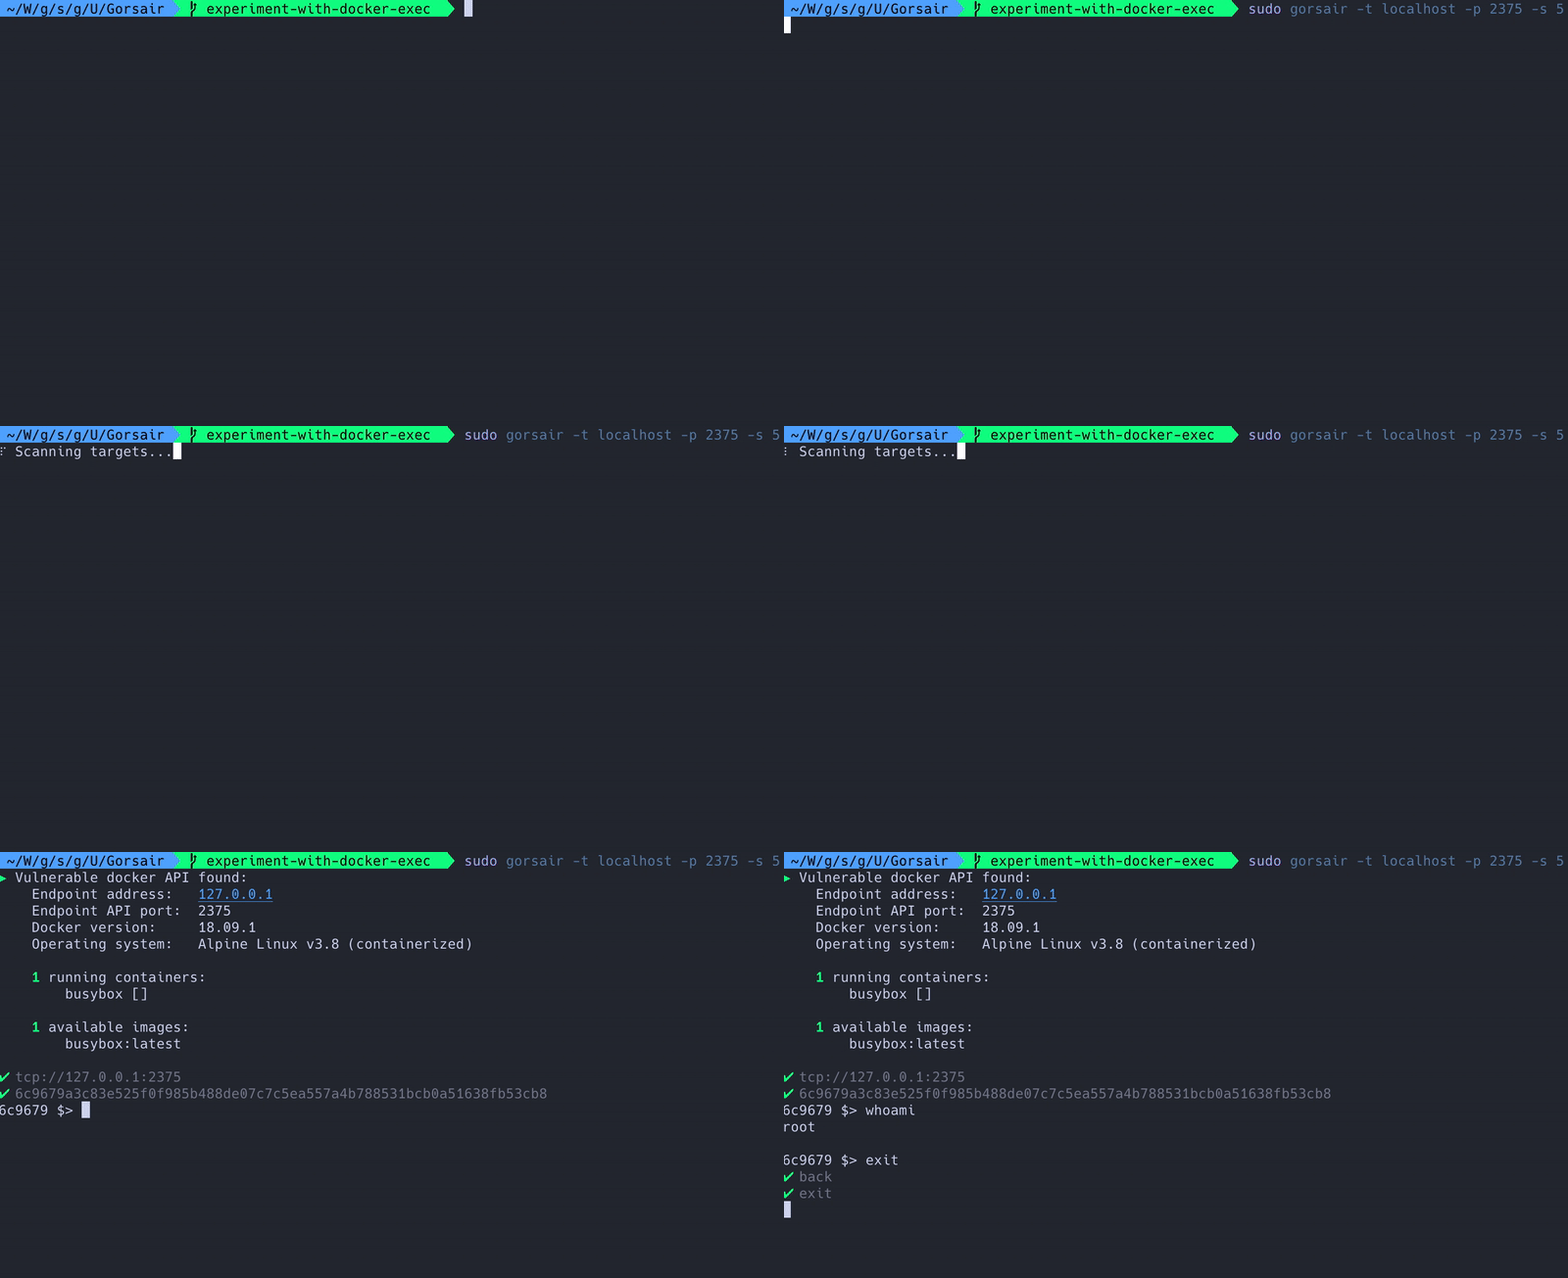
                is a penetration testing tool for discovering and remotely accessing Docker APIs from vulnerable Docker containers. Once it has access to the docker daemon, you can use Gorsair to directly execute commands on remote containers.

Gorsair hacks its way into remote docker containers that expose their APIs.


Exposing the docker API on the internet is a tremendous risk, as it can let malicious agents get information on all of the other containers, images and system, as well as potentially getting privileged access to the whole system if the image uses the root user.


Install

From a release

Set the:
  • GORSAIR_VERSION to whatever release you are interested in
  • OS to your operating system (linux, windows or darwin)
  • ARCH to your architecture (amd64, arm, or ppc64le)
And then run the following command to install gorsair.
curl https://github.com/Ullaakut/Gorsair/releases/download/$GORSAIR_VERSION/gorsair_$OS_$ARCH --output /usr/local/bin/gorsair

From the sources

  • Make sure that you have a go version that supports modules (versions 1.11 and above)
  • Make sure that your environment contains the GO111MODULE variable set to on
  • Run go build -o /usr/local/bin/gorsair cmd/*.go from the root of this repository

Command line options

  • -t, --targets: Set targets according to the nmap target format. Required. Example: --targets="192.168.1.72,192.168.1.74"
  • -p, --ports: (Default: 2375,2376) Set custom ports.
  • -s, --speed: (Default: 4) Set custom nmap discovery presets to improve speed or accuracy. It's recommended to lower it if you are attempting to scan an unstable and slow network, or to increase it if on a very performant and reliable network. You might also want to keep it low to keep your discovery stealthy. See this for more info on the nmap timing templates.
  • -v, --verbose: Enable more verbose logs.
  • -D, --decoys: List of decoy IP addresses to use (see the decoy section of the nmap documentation)
  • -e, --interface: Network interface to use
  • --proxies: List of HTTP/SOCKS4 proxies to use to deplay connections with (see documentation)
  • -S, --spoof-ip: IP address to use for IP spoofing
  • --spoof-mac: MAC address to use for MAC spoofing
  • -v, --verbose: Enable verbose logging
  • -h, --help: Display the usage information

How can I protect my containers from this attack

  • Avoid putting containers that have access to the docker socket on the internet
  • Avoid using the root account in docker containers
Ref Link: https://github.com/Ullaakut/Gorsair

Sunday, January 13, 2019

GUI Based Snort Rule Creator / Maker - SNORPY

SNORPY:

                        A Simple GUI / Web Based Snort Rule Creator / Maker for Building Simple Snort Rules.

Snorpy is a simple Snort rule creator / builder / maker made originally with python but I made the most recent version with Node and jquery.


#Install
  1. Install nodejs
  2. Download repo
  3. Unzip the file name node_modules.zip
  4. cd /to/the/path/of/app.js
  5. run the following command: "node app.js"
Should be that easy.

Video Ref : https://vimeo.com/182794567

Download Link : https://github.com/chrisjd20/Snorpy

Online Play : http://snorpy.com/

Monday, September 17, 2018

Free / Open Source Compromise Assessment Tools

OTX ( Open Threat Exchange ):


                                     AlienVault provides OTX Endpoint Threat Hunter and its free, fast, and simple.


AlienVault threat hunting service delivers as much threat intelligence power as OTX Endpoint Threat Hunter. It is the Open & free service that natively uses the community-powered threat intelligence of OTX to scan your endpoints for known indicators of compromise (IOCs).

OTX Endpoint Threat Hunter uses the same agent-based approach as expensive endpoint security tools and DIY open source agents without the expense, complexity, or guesswork. 


How It Works
  • OTX Endpoint Threat Hunter is available to any registered Open Threat Exchange (OTX) user. It’s free to join OTX.
  • To get started, download and install the AlienVault® Agent on the Windows or Linux devices you want to monitor. The AlienVault Agent is immediately ready to find threats.
  • You can launch a query on any endpoint from OTX by selecting a pre-defined query that looks for IOCs in one or more OTX pulses.
  • Once launched, the AlienVault Agent executes the query, and the results of the query display on a summary page within OTX.


CERTitude:


       is a Python-based tool which aims at assessing the compromised perimeter during incident response assignments. It allows analysts to perform large scale scans of Windows-based information systems by searching for behavioral patterns described in IOC (Indicator of Compromise) files. The tool is currently composed of two main components:
  • The Python Flask-based web interface, used to configure the scans and visualize their results;
  • The scanner that connects to remote targets and runs the search for IOCs.
CERTitude is an open-source tool developed by the CERT-Wavestone. It is brought to you freely, but user support is only provided on a best-effort basis.

Compatibility

CERTitude is compatible with a wide range of target Windows operating systems, from XP / 2003 to Windows 10 / Server 2016. Though CERTitude can be run from a Linux host, it is only fully supported on Windows as some features may not be implemented on Linux.

Features:

  • Ability to scan hosts in a way that prevents the target workstation from knowing what the investigator is searching for
  • Ability to retrieve some pieces of data from the hosts
  • Multiple scanner instances (for IOCs and/or hash scans) can be run at the same time for parallel scanning
  • Built with security considerations in mind (protected database, secure communications with hosts using IPSec)


Sunday, March 22, 2015

Best / Open Source Wordpress Vulnerability Scanner

WPScan :

                 is a black box WordPress vulnerability scanner.


WPScan comes pre-installed on the following Linux distributions:
Prerequisites:
  • Ruby >= 1.9.2 - Recommended: 2.2.1
  • Curl >= 7.21 - Recommended: latest - FYI the 7.29 has a segfault
  • RubyGems - Recommended: latest
  • Git
 Download Link : https://github.com/wpscanteam/wpscan

Flunym0us :

                   is a Vulnerability Scanner for Wordpress and Moodle.


                 Flunym0us has been developed in Python. Flunym0us performs dictionary attacks against Web sites. By default, Flunym0us includes a dictionary for Wordpress and other for Moodle.


Flunym0us requires python.

Arguments allowed:
-h, --help: Show this help message and exit
-wp, --wordpress: Scan WordPress site
-mo, --moodle: Scan Moodle site
-H HOST, --host HOST: Website to be scanned

Download Link : https://code.google.com/p/flunym0us/downloads/list

 Timthumb :

                Vulnerability Scanner plugin will scan your entire wp-content directory for instances of any outdated and insecure version of the timthumb script, and give you the option to automatically upgrade them with a single click. Doing so will protect you from hackers looking to exploit this particular vulnerability.

            Scans your wp-content directory for vulnerable instances of timthumb.php, and optionally upgrades them to a safe version.


Download Link : https://downloads.wordpress.org/plugin/timthumb-vulnerability-scanner.zip

 Vane :

          is a GPL fork of the now non-free popular WordPress vulnerability scanner WPScan.


Prerequisites

  • Windows not supported
  • Ruby => 1.9
  • RubyGems
  • Git
Download Link : https://github.com/delvelabs/vane


WordPress Security Scan

                           Online WordPress Security Scanner to test vulnerabilities of a WordPress installation. Checks include application security, WordPress plugins, hosting environment and web server.

Online URL : http://hackertarget.com/wordpress-security-scan/


Wednesday, March 11, 2015

Best / Open Risk Assessment / Analysis Tool

CORAS:

               is a method for conducting security risk analysis. Platform for risk analysis of security critical IT systems using UML, based on the CORAS model-based risk assessment methodology. Contains an XML and UML repository, facilitating management and reuse of analysis results.


               CORAS provides a customised language for threat and risk modelling, and comes with detailed guidelines explaining how the language should be used to capture and model relevant information during the various stages of the security analysis. In this respect CORAS is model-based. The Unified Modelling Language (UML) is typically used to model the target of the analysis. For documenting intermediate results, and for presenting the overall conclusions we use special CORAS diagrams which are inspired by UML. The CORAS method provides a computerised tool designed to support documenting, maintaining and reporting analysis results through risk modelling.

Download Link :

http://coras.sourceforge.net/downloads.html

or

http://sourceforge.net/projects/coras/files/latest/download?source=navbar 

Microsoft Security Assessment Tool 4.0:


                                                           is the revised version of the original Microsoft Security Risk Self-Assessment Tool (MSRSAT), released in 2004 and the Microsoft Security Assessment Tool 2.0 released in 2006. Security issues have evolved since 2004 so additional questions and answers were needed to ensure you had a comprehensive toolset to become more aware of the evolving security threat landscape that could impact your organization.


There are two assessments that define the Microsoft Security Assessment Tool:


  • Business Risk Profile Assessment
  • Defense in Depth Assessment (UPDATED)
Download Link : http://www.microsoft.com/en-in/download/details.aspx?id=12273

PTA (Practical Threat Analysis):

                                     is a risk assessment methodology and a suite of software tools that enable users to find the most beneficial and cost-effective way to secure systems and applications according to their specific functionality and environment. 


Download link : http://www.software.co.il/ptadownload/pta1215.exe


ISO 17799 RAT ( Risk Analysis Toolkit ) :

                           to perform risk analysis based on the ISO 17799 on public or private companies.

This analysis was conducted by questionnaire, from which reports on security policies will be generated to perform in the organization to address the risks identified.


Confidentiality, integrity, availability, authenticity and traceability (accountability): the risks are analyzed in several dimensions. The impact of risk is also analyzed
To address the risks and impact are proposed:

    Safeguards (or countermeasures)
    Safety Standards
    Safety procedures
    Elements backup (back up)
    Disaster Recovery Plans

The motivation for choosing this project has been the lack of free software tools that enable risk management in organizations, especially SMEs can not afford the cost of existing commercial tools on the market.

 Download Link : http://ratiso17799.sourceforge.net/descargas.html

Security Officers Management and Analysis Project (SOMAP):

                              is all about defining security management work methods and supplying Security Officers with tools to do their job more efficient and following standards easily.


Features

  • Information Security Risk Management Methodologies and Tools
  • Open Risk Model Repository
  • Risk Assessment
  • Risk Management
Download Link : http://sourceforge.net/projects/somap/files/latest/download?source=navbar


Wednesday, August 28, 2013

Nginx Anti Xss & Sql Injection : NAXSI ( Open-Source WAF )


NAXSI ( Nginx Anti Xss & Sql Injection ) :
                                                             is an open source WAF ( Web Application Firewall ) , high performance, low rules maintenance, Web Application Firewall module for Nginx. 


  _   _                _ 
 | \ | | __ ___  _____(_)
 |  \| |/ _` \ \/ / __| |
 | |\  | (_| |>  <\__ \ |
 |_| \_|\__,_/_/\_\___/_|
 
                          goal is to help people to secure their web application against attacks 
such as SQL Injection, Cross Site Scripting, Cross Site Request Forgery, 
Local & Remote file inclusions and such. 
The difference with most WAF (Web Applicative Firewalls) out there is that 
it does not rely on signatures to detect attacks. It is using a simpler model, 
where instead of trying to detect "known" attacks, it will detect unexpected 
characters in the HTTP request/arguments. Each kind of unusual character will 
increase the score of the request. If the request reaches a score that's 
considered "too high", the request will be denied, and the user will be 
redirected to a "forbidden" page. Yes, it works a bit like a spam system. 


NAXSI Project:
                        The NAXSI Project is not so known like the ModSecurity open source project, but has a very interesting approach and features.
NAXSI uses the small and performant reverse proxy engine of Nginx web server instead of the full blown Apache engine used by ModSecurity (and from a security point of view: the lesser code).
Following are the major feature of NAXSI:
  • Protects from XSS, SQL injections, CSRF, file inclusion
  • Fast engine
  • Relative simple configuration
  • Check GET/POST requests
  • Check HTTP headers and cookies
  • Forbid dangerous symbols and SQL keywords
  • Allows whitelist approach configuration creating a web application baseline
  • Able to run in learn or production mode
  • Uses no signature of known attack

Installation

Let’s do a quick installation with ubuntu sever 12.04 LTS. You may also install it from the sources following the Nginx prerequisites for reference. After you’ve installed the basic server with openssh, install NAXSI with:
 sudo apt-get install nginx-naxsi

Initial configuration

In the nginx configuration file (/etc/nginx/nginx.conf) uncomment this line to activate the basic rulesets:
##
# nginx-naxsi config
##
# Uncomment it if you installed nginx-naxsi
##
include /etc/nginx/naxsi_core.rules;
Note that this file is not an attack signature repository but rather a “score rules” set. Let’s configure NAXSI for our website www.scip.ch. To do so edit the Nginx configuration file in /etc/nginx/sites-enabled/default and add following entries in the server context:

server {
        proxy_set_header Proxy-Connection “”;    
        listen   80;

        location / {
                # put your website IP here
                proxy_pass http://80.74.141.2/;

                # put your website FQDN here
                proxy_set_header Host www.scip.ch;

                # Uncomment to enable naxsi on this location
                include /etc/nginx/naxsi.rules;
                }

        # Only for nginx-naxsi : process denied requests
        location /RequestDenied {
                # For example, return an HTTP error code
                return 418;
                }
        }
 
Now you should be able to start the nginx service that will bring up the NASXI with following command:

sudo service nginx start
 
Be sure to check for error messages on the console or in the error log found in /var/log/nginx/error.log and verify with sudo netstat -antup that nginx daemon is opening the configured port (tcp/80 in our case). The output should look like this:

Active Internet connections (servers and established)
 
Proto Recv-Q Send-Q Local Address    Foreign Address   State       PID/Program name
tcp        0      0 0.0.0.0:80       0.0.0.0:*         LISTEN      9865/nginx
tcp        0      0 0.0.0.0:22       0.0.0.0:*         LISTEN      8484/sshd
tcp        0      0 127.0.0.1:6010   0.0.0.0:*         LISTEN      9627/0
tcp        0      0 127.0.0.1:6011   0.0.0.0:*         LISTEN      9062/1
tcp        0     32 x.y.z.52:22      x.y.z.36:49749    ESTABLISHED 9046/sshd: anco
udp        0      0 0.0.0.0:68       0.0.0.0:*                     649/dhclient3

To test if it works, start a browser session and point it to the ip address of your test server (x.y.z.52:80) and you should see the website you configured (www.scip.ch) in the config file above. To continue further testing make sure you will proxying all web request to the nginx-NAXSI WAF. To accomplish this you can ether use the web-proxy configuration setting in the browser or fake the testing website ip address in your system hostfile. I prefer to put the ip address in my hostfile:

x.y.z.52     www.scip.ch
 
Here are the location of the target hosts file (you need admin right to save changes):

OS Host Configuration File
Windows %SYSTEMROOT%\system32\drivers\etc\hosts
Linux /etc/hosts
 
Now we can browse to www.scip.ch and be sure that our test NAXSI WAF will inspect the content and remember that by now the configuration is in learning mode; it will only report errors in the nginx error logs (/var/log/nginx/error.log) and not block any bad scored request.

How It Works

The naxsi_core.rules are responsible for scoring the HTTP input and looks like this (excerpt):
MainRule "str:;" "msg:; in stuff" "mz:BODY|URL|ARGS" "s:$SQL:4" id:1008;
#
MainRule "str:<" "msg:html open tag" "mz:ARGS|URL|BODY|$HEADERS_VAR:Cookie"
"s:$XSS:8" id:1302;
#
MainRule "str:&#" "msg: utf7/8 encoding" "mz:ARGS|BODY|URL|$HEADERS_VAR:Cookie"
"s:$EVADE:4" id:1400;
#
MainRule "rx:.ph*|.asp*" "msg:asp/php file upload!" "mz:FILE_EXT"
"s:$UPLOAD:8" id:1500;
Insight this file is the logic configuration used to score the input; the result will be used in /etc/nginx/naxsi.rules to decide if such input may be allowed or not. The format is quite simple:
  1. Define what to look for: string (str:) or regular expression (rx:)
  2. Define message to report into logfiles (msg:)
  3. Put the rule a category (s:)
  4. Assign rule identifier (id:)
  5. Define where to look for (mz:) and short description below
mz entry Look in
URL URL path
ARGS HTTP argument
BODY HTML body entry
$HEADERS_VAR: HTTP header variable
Now let’s take a look on the second NAXSI config file /etc/nginx/naxsi.rules where the main NAXSI behavior is defined; this is how it looks like:

# config mode section
LearningMode;
SecRulesEnabled;
#SecRulesDisabled;
DeniedUrl "/RequestDenied";
#
# check rules section
CheckRule "$SQL >= 8" BLOCK;
CheckRule "$RFI >= 8" BLOCK;
CheckRule "$TRAVERSAL >= 4" BLOCK;
CheckRule "$EVADE >= 4" BLOCK;
CheckRule "$XSS >= 8" BLOCK;
 
Here is an explanation of the contents:
  1. LearningMode – activates learning mode; in this mode requests aren’t blocked and white lists may be created.
  2. SecRulesEnabled or SecRulesDisabled – to activate or disable NAXSI for this location/section.
  3. DeniedURL – redirect URL for blocked requests; can be an HTTP error code (like 4xx or 5xx) or forward to an HTML site with code to help track false-positives.
  4. CheckRule – per-category check scores; the score we saw above will be evaluated here. If a request hits a score in the naxsi.core.rules, this score will be recorded and added to each category (SQL, XSS, EVADE, ...) if the overall score for any of the categories is reached (8 in SQL per default) the input is treated as bad.
When you use the whitelist (positive secure model) approach you’ll find also the white-list entries (BasicRule statement) in this config file:
# Whitelist '|', as it's used on the /report/ page, in argument 'd'
BasicRule wl:1005 "mz:$URL:/report/|$ARGS_VAR:d";
# Whitelist ',' on URL zone as it's massively used for URL rewritting !
BasicRule wl:1008 "mz:URL";
The entry above will result in disabling some part of the check rule in naxsi_core.rules allowing a specific behavior and eliminate false-positives. BasicRule could be more or less specific at your pace (and security needs).

Information Gathering

At this stage we have our test installation inspecting the HTTP flow and reporting bad things in the /var/log/nginx/error.log file, let’s take a look on how NAXSI error entry looks like:

> error.log <
2012/11/30 04:57:55 [error] 9866#0: *47 NAXSI_FMT: ip=x.y.z.36&
server=x.y.z.52&uri=/testmiztot&total_processed=8589934625&
total_blocked=679029381853280060&zone0=URL&id0=1999&
var_name0=, client:x.y.z.36, server: localhost, 
request: "GET /testmiztot HTTP/1.1", host: "x.y.z.52"

As you can see it’s a special error message: it was generated on a “special” HTTP URL GET request and is not a really bad request. To test the functionality on the WAF I’ve created this test-rule in the  

/etc/nginx/naxsi_core.rules:
MainRule "str:testmiztot" "msg:foobar test pattern" "mz:URL" "s:$SQL:42" id:1999;

This rule will trigger whenever the testmiztot string is detected in the address part (mz:URL) of the HTTP GET request and score as 42 (s:$SQL:42) in the SQL category. This will be evaluated as bad because the SQL category limit is 8. The msg: text will be shown in the learning mode log used to generate the white-list baseline.

 Analyze in detail the meaning of these commands:
  • LearningMode - Training Mode is enabled. Requests are not blocked, White-shaped leaf.
  • SecRulesEnabled - NAXSI enabled for this location. If you want to switch off for another location (for example, a protected inner zone), then do it SecRulesDisabled.
  • DeniedURL - URL redirect for the denied requests.
  • CheckRule - checking the "penalty points" query by category.
  • / Etc / nginx / mynaxsi.rules - generated rules (not yet gener - commented out).

Official Change Log For Naxsi 0.41:-
Feature: added support for FILE_EXT. We can now control file uploads names/extensions as well.
Added a rule for FILE_EXT into naxsi_core.rules
Added unit testing for FILE_EXT feature
Fixed erroneous log messages
Fixed an error on whitelist of types $URL:xxx|URL

To Know More : https://code.google.com/p/naxsi/

To Download : https://code.google.com/p/naxsi/downloads/list

OWASP Naxsi Project : https://www.owasp.org/index.php/OWASP_NAXSI_Project

NAXSI Matrix : https://docs.google.com/spreadsheet/ccc?key=0AjuNPnOoex7SdG5fUkhfc3BCSjJQbVVrQTg4UGU2YVE#gid=0

 NAXSI Presentation : http://www.slideshare.net/phdays/naxsi-an-open-source-waf-for-nginx


Wednesday, August 15, 2012

Live CD - OWASP - Open Web Application Security Project

OWASP :

Open Web Application Security Project is a worldwide not-for-profit charitable organization focused on improving the security of software. Our mission is to make software security visible, so that individuals and organizations worldwide can make informed decisions about true software security risks. 

 OWASP Live CD project was originally started to update the previous OWASP Live CD 2007.

OWASP Live CD installed to a physical or virtual hard drive (VMware) is available and work continues on making other versions of the project available including a bootable USB, portable VM installation, an installation for the Asus Eee PC. These are either downloadable files or instructions on how to create the alternate delivery mechanisms.

OWASP project leaders are responsible for defining the vision, roadmap, and tasks for the project. The project leader also promotes the project and builds the team. Tools and documents are organized into the following categories:
  • PROTECT - These are tools and documents that can be used to guard against security-related design and implementation flaws.
  • DETECT - These are tools and documents that can be used to find security-related design and implementation flaws.
  • LIFE CYCLE - These are tools and documents that can be used to add security-related activities into the Software Development Life Cycle (SDLC).


Video Tutorial : http://www.youtube.com/user/AppsecTutorialSeries

OWASP Live CD Download Link : Web Testing Environment (WTE) ISO

Username : owasp / Password  : owasp

OWASP Live CD VMWare Image Download Link : OWASP-livecd.vmx

Thanks to RRN Technologies Team